Friday, 19 June 2015

Clockwork Goblin Shreckwulfen

I was very honored to be asked if I'd like to paint some of Clockwork Goblins prototype Shrekwulfen figures for their 28mm War without End range of weird war models. 

These are very fun figures, and very nicely done with lots of character. The figures are due to be released very shortly, and Clockwork Goblin often upload Bolt Action compatible rules for their models too.


I'm not sure what the price will be on these yet, but Clockwork Goblin seem to aim to keep their prices in line with all the other major manufacturers.The Shreckwulfen are fairly large and have a significan presence to them, and look great alongside figures from say Warlords range.


If your into weird war I really recommend checking out the range! 


As ever you can see more of my work at Volley Fire Painting service and you can keep an eye on Clockwork Goblins rather cool ranger at their website http://www.clockworkgoblinminis.co.uk/

Waterloo Game

To commemorate the bicentennial anniversary of the Battle of Waterloo my Bro Jay and I have been planning a big game of Black Powder to coincide with the anniversary at his pub the Marquis of Lorne in Gillingham, Kent. Unfortunately due to work and time constraints I wasn't able to get enough figures done so we decided to do a series of linked skirmish games using the Musket and Tomahawk rules.


We played 4 games, in total, first was the recreation of the French attack at Hougamont Farm, The second was the French cavalry attacks. Third game was the British advance, and the final game was the Prussian attack on Plancenoit. Initially the campaign was going to be 3 games, so I had only drawn up scenarios for the first 3 games with victory points towards the campaign progression, so haven't included the final Plancenoit battle in the outcome.

 I had intended to add Hannoverians and Nassau forces, as well as more French of various types, however was unable to get these finished in time, so our games were very much a British versus French affair.

Hougamont
This battle saw us set up the farm complex in the top center of the 6x4 board we would be using for all 4 games. This scenario required the French to break into the courtyard of Hougamont and remain there for an entire turn. The British would win if they managed to prevent this. 


The winner would receive 2 Victory points towards the campaign total. I had 2 units of riflemen, and 2 units of light infantry in the complex, and had to hold out against recycling waves of small units of French Line, Chasseurs and Grenadiers for 8 turns.

 On the 4th turn the British forces were reinforced with some more Guards infantry. This was a very hard fought battle, we both forgot to take note of just how many casualties but the sharp shooters on the roof took a heavy toll on the French.

Towards the end of the battle the French did break into the farm complex, but were cut down. They nearly broke in a second time, but were driven back at the very last minute with a few short range musket volleys. If we had played another turn or two the outcome may have been different, but ultimately it was a victory for the British!

2 Victory Points to British!


Charge!
This scenario pitched waves of French cavalry (Lancers as that was all we had) attacking the British Squares and guns. We ruled that the squares couldn't move, and could only fire from each facing. The melee rules in M&T are a little weak with regards to cavalry, so we left those as they were. Victory points in this scenario were awarded with 1 point being awarded for each gun destroyed or square broken. To break a square the cavalry had to kill an entire facing. Conversely British forces recieved a victory point for each gun and square surviving at the end of turn 6. The French took a lot of casualties, but were ultimately able to break one square, and see off the crews of both guns. The final British square was too much for them though, and they were finally driven off.

3 Victory Points to the French, and 1 for the British!


The British Advance
This was intended to be the final battle of our linked scenarios, however we ended up playing one further game after this. 
 The scenario this time was for the both forces to score points for destroying the opposing forces units, and bonus points for being in their deployment zone. 1 Victory point was awarded per unit destroyed, and 2 additional points for having a unit in within 12 inches of the opposing players table edge. 


 Forces involved were 4 ten man line units, 2 5 man rifle units and 2 5 man light units for for the British, against 2 10 man line units, a 12 man line unit, a command unit, and a small unit each of grenadiers and chasseurs for the French, as well as some lancers.
Jay had possibly the worst luck with dice I have ever seen in all my years of gaming, whereas mine was spectacular, this combined to allow the British to annihilate the French for minimal casualties. 

7 Victory points to the British, The French, Erm...

Plancenoit

We had a bit of time left and a new player, so decided to do a small, plancenoitish game, with 2 units of 10 Prussian Line against 12 French Line, 4 Grenadiers and 4 Chasseurs. This used a similar scenario to the Hougamont game, except the Prussians weren't going to be recycled. 

They had to get to the centre of Plancenoit and then hold it for a turn, with 2 Victory points being awarded to the Prussians if they managed it, and to the French if they managed to defend.This was another very bloody game that came right down to the wire, ultimatly though the French Chasseurs managed to drive off the Prussians, and that was the end of the game.

2 Points to the French!

Total Victory Points for the campaign

10 points to the British and allies, 5 for the French.


This was a very fun series of linked games, and I urge anyone to give it a go, even if it requires thinking outside the box a little As ever you can see more of my work here at Volley Fire Painting service and if your in Kent and are interested in having a game in a pub, drop Jay a message at The Marquis of Lorne Ale house

Sunday, 7 June 2015

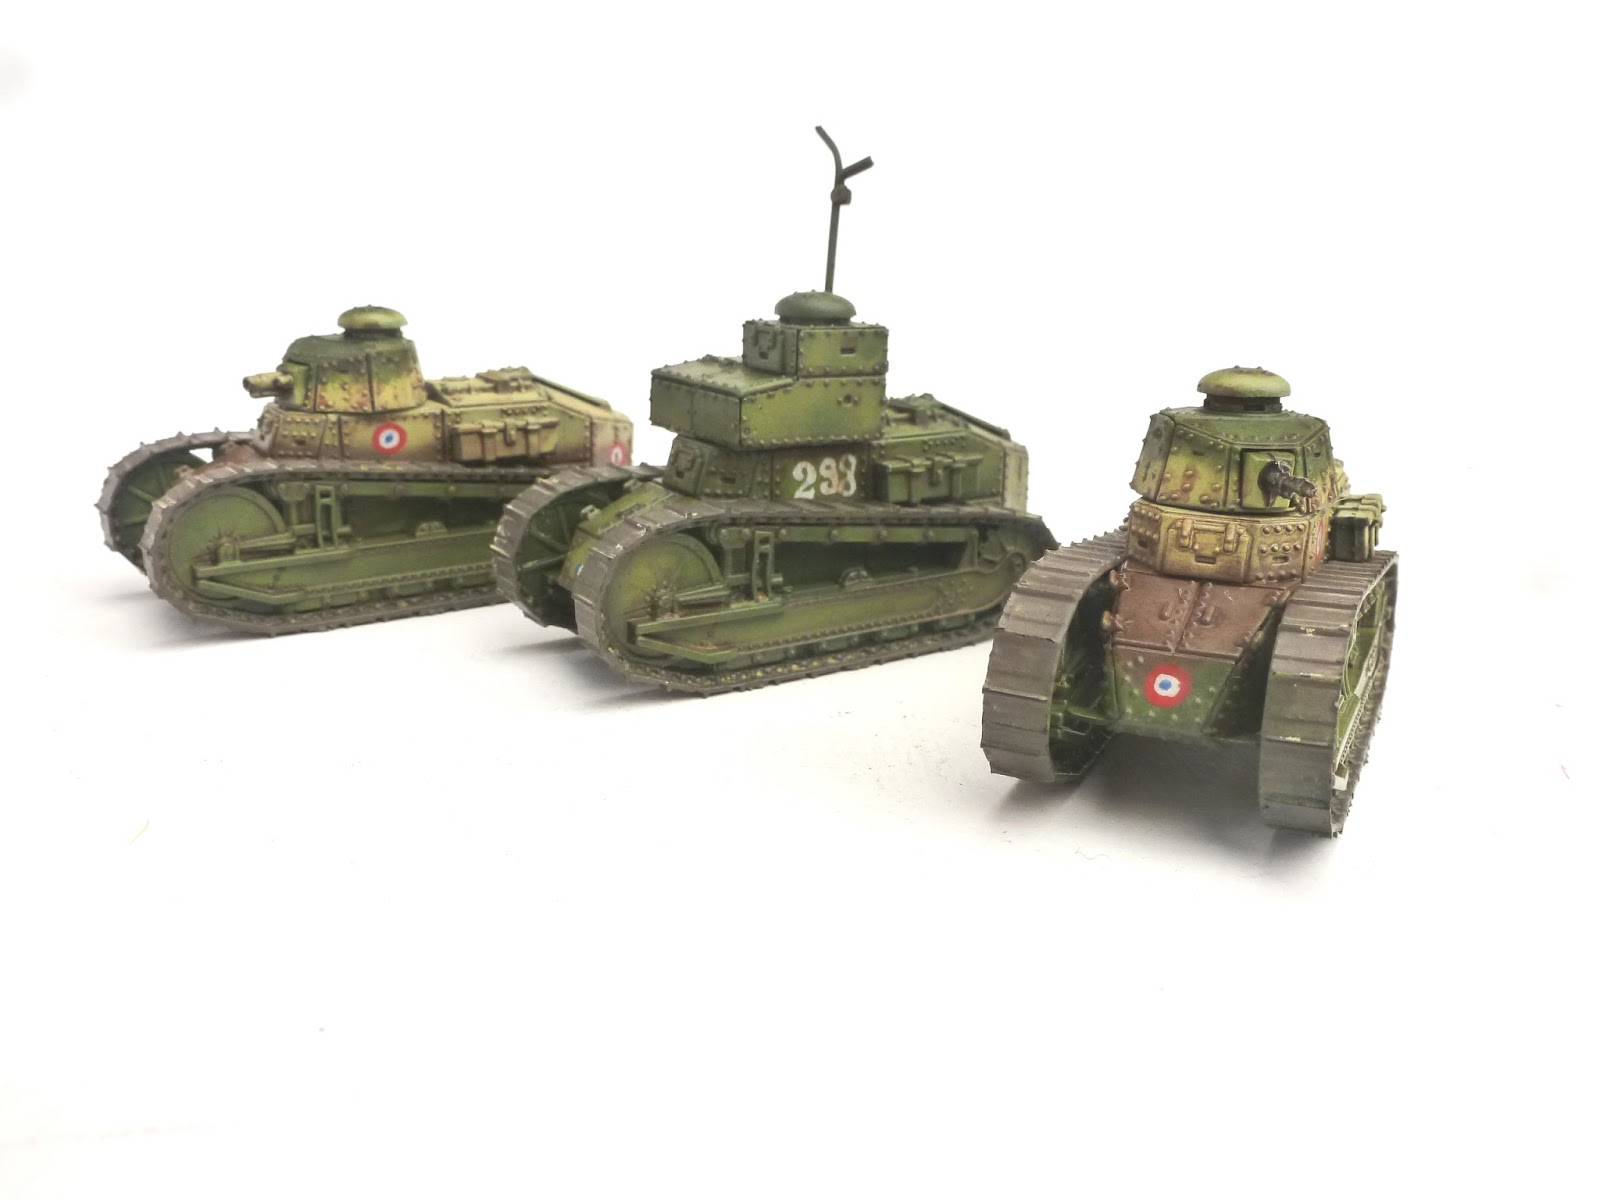
Trenchworx FT17 and Rolls Royce armoured car review

Today I'm looking at a couple of vehicles I've recently built as part of a commission for my friend Rob.

Trenchworx are a new company (To me anyway), and started off producing 3D printed models, but are now moving to doing resin kits. Trenchwox have recently had a very successful kickstarter to expand the range with early WW2 (And pre-war) Russian and Japanese armour.


 Trenchworx also have some interesting items for other ranges, including a beautiful looking T-38 and German heavy howitzer. If your looking for something obscure this is a company to watch.

Rob sent me the FT17's fully assembled, however the Rolls Royce were for me to build, and they were incredibly easy to assemble. parts were impressively crisp, and detail very sharp.


I don't know if it's included in all their kits, but the Rolls Royce armoured cars actually had magnets as well to hold the turret in place. The resin feels very much like an injection molded plastic as used by say Warlord or Rubicon, however it still needs to be bonded with superglue.Building both the rollers took maybe 10 minutes, including the time spent looking for a magnet I dropped, and drinking my coffee.


As the resin was quite shiny and an unknown resin to me, I decided to go all out with priming the models and used an ultrasonic bath and automotive primers for the armoured cars, however Rob had just done a normal clean up and prep for the FT-17's, and I didn't notice any difference to paint adhesion, the resin seems to really accept paint well even with its glossy, smooth texture.


For the camo pattern on the Rollers I used Russian Uniform with the disruptive green applied using Reflective green, with weathering carried out with artists oils.


The FT-17's I used the same green's, but also used a mixed light grey, and sand yellow for those vehicles that needed it. Mostly they were done using trial and error however! These were weathered with artists oils, and then some Mig pigments which were sealed with Mig pigment fixer. 


I'd thoroughly recommend these kits, and look forwards to what the future brings. Click this link to visit the Trenchworx website, and you can see more of my own work at Volley Fire Painting

If your in the United States, and more specifically Ohio, it's worth taking a look at the Bolt Action Ohio Facebook page too https://www.facebook.com/groups/308871755930203/?ref=bookmarks


Thursday, 4 June 2015

Terminator Genisys Miniatures Game review

Before we start, click here and have your speakers on.

Done it?  If not 'Do it, do it now! (Yes different franchise, but still).

First off a disclaimer, I've been a fan of the Terminator series for as long as I can remember, longer, probably given how bad my memory is. I'm also a fan of Alessio Cavatore's work, so when I first discovered that he was writing a rule set for a game based up the upcoming movie I was extremely excited, then I discovered that the figures were being sculpted by the Perry's and I spent the next 3 days squealing like a 12 year old girl at a Justin Beiber concert. As such writing an objective review will be difficult, but I'll give it a go.

What do you get for your 70 quid? 

Lots. For the purposes of clarity I shall elaborate. a set of card range rulers,  All the card counters you could need for the game, and a set of card barricades and terrain markers. There is also a quick play rule book, a reference sheet, a selection of fancy dice, a double sided printed heavy paper play mat, 10 Terminator Endoskeletons, 5 Terminator Crawlers, 16 Resistance fighters, and a Kyle Reese miniature. All the figures are hard plastic, apart from Kyle Reese, and are scaled to 28mm scale. Oh yes, and a very nice rule book too.More on that next...

The Rules

I love simple rules, especially ones that add a sense of the dramatic without being complicated. The rules for Terminator are very simple, I was able to pick them up and have a solo test game whilst eating my breakfast yesterday. Initiative is decided at the beginning of each turn with a dice roll off, then the highest scoring player rolls a special fate dice to see how many models they can activate, 1-2 or none, then once they have done something the 'Impulse' as it's called ends and the opponent gets to roll the fate die. This is repeated until all models have activated, the turn is then over, and the cycle begins anew. 


Moving and fighting is very simple, based on skill based dice rolls, the better someone is at a task the bigger the dice they can use for the test, the largest dice being the D20. This is nicely colour coded in the rules and reference sheet too, meaning you can play without having to worry about keeping track of modifiers to dice scores.

Some mechanics particularly shined to me, I loved the wat commanders can allow you to reroll a fate die in certain conditions, and inspire other models to act with them. By far the coolest though is the system for allowing you to put down a stunned enemy with an action called (What else) 'Hasta La vista'. 

Playing through the quick start rules, I think it took me about 45 minutes to play through 2 scenarios and get my head into how it works. I've since been working my way through the main rule book and can't wait to play some bigger games. 

The rule book does contain pointed army lists, as well as rules for vehicles and AIRCRAFT!!!!
I can see myself using these for other games as well. I'm already considering a 40k conversion, and using them for modern and near future games as well. 

The Models

Machines
You get 10 Endoskeletons in 2 poses. These are simple quick to assemble plastic models, although the poses are quite static, that's the nature of the beast. Watch any of the movies and the Endoskeletons aren't that nimble. Saying that they are also very easy to repose and convert. You can see some I made earlier Here who have been converted somewhat. Also my paint recipe is there too if you want to know how I did the chrome.

You also get 5 crawlers too. Whats a crawler you may ask! When a Terminator is killed, there's a chance it may come back as a crawler. No guns, but it can give your resistance fighters ankles a nasty chewing as I discovered during one of my test games... 


Resistance
You get 4 sprues of 4 plastic fighters sculpted by the Perry's. The torsos's are one piece, with arms fitted that hold their weapons added to this. 


The models themselves are nicely detailed, and all share at least a passing resemblance to 80's action heroes. In terms of weapons, there is a missile launcher, grenade launcher, and several plasma and assault rifles on each sprue, as well as a set of arms wielding a shot gun. Again the figures are cleanly molded and very characterful, matching up well to the pictures of the resistance from the upcoming film. 


I' ve attached a pic of an Endo and a  resitance fighter next to a Warlord plastic German, as you can see, they are a little taller, but still good. These figures could also make good alternatives for those 40k players on a budget looking to flesh out their Guard and Necron forces. 


Kyle Reese is metal, and slightly taller than the plastic figures in the set. I believe this is an effort to make the hero figures stand out from the rank and file, and whilst it's not particularly noticeable, there's enough difference for it to work.


Conclusion


In all, I think this is a superb package, containing everything you need to get playing the game quickly, and have enough options so that no 2 games will be the same. I'm excited to see what the future holds for the game especially in relation to the film franchise

If I were to try and pic some critiques some more film specific scenarios would have been good, however I understand that the licensing is a huge constraint here, and I suspect more will be available through the River horse website and Facebook group for the game. I'd also like to see more of a tie in with the earlier films, however again this comes into conflicts of licenses, and is somewhat nit picking as the rules even have pointed lists for 1984 Police units... 


As ever you can find more of my work at Volley Fire Painting Service, all figures in this review were painted by myself.You can order the game itself from Warlord Games


Sunday, 17 May 2015

Rubicon Models SDKFZ 251/D Review

I love Hanomags. When I first started second world war reenacting the first vehicle I ever rode around in was an Sdkfz-251/D, and it was an amazing experience. The vehicle is surprisingly small and when you jump out the hatch you learn very quickly not to have your entrenching too hanging off your belt, as it tangles very easily...!


Rubicon were kind enough to send me a test shot of their recently released Sdkfz 251D 3 in 1 kit, and my apologies to them that it has taken so long to get around to reviewing it.


This is a very nice kit, and allows construction of an ambulance version, a personnel carrier, a pioneer version, and an anti-tank gun variant that allows you to build the 37mm anti tank gun with either early or late gun shield. It's worth noting though that if you pick the Ambulance version you won't be able to swap the bits out and use it as a transport model, at least not easily.

I built mine as an Sdkfz 251/7 the Pioneer version with assault bridges. It may be possible to make the model and not glue the bridges down, but I think they would fall off fairly frequently and potentially get lost.To add a little interest to the model I turned the front wheels slightly, by gently (And nervously..) applying pressure to the wheels once they were fitted.


Detail is very nice and very delicate. Some drilling is required to open up slots on the mud guards and hull depending what version you decide to do, and it's really worth sitting and reading the instructions once or twice before building, and to go in with a plan on how you will make the model.  I'd recommend some dry fitting too before committing to glue.


As mine was a pre-release version of the model I found a few fit problems with the hull, however I suspect these have been resolved now. It's nothing a little filler can't fix too.

I painted mine using Vallejo Middlestone, Luftwaffe Camo Green and Red Leather, then used artists oils and Mig pigments for the weathering.

Assembley took me around 20-30 minutes once I had decided the version I wanted to build. Now that the kits done I have a nicely stocked bits box with stretchers and a 37mm anti tank gun too that I can see being worked into a conversion in the future too.

All in I'd recommend this kit, and the 251 family from Rubicon, and I'll probably do a comparative piece in the future with this and other 251 kits similar to my recently finished series of StuG articles.


Rubicon models website can be found at this link And as ever more of my work can be seen at Volley Fire Painting Service

Wednesday, 6 May 2015

Warlord Games Veteran Grenadiers review

Tonight I'm looking at Warlord games Veteran grenadier set. These figures have been available for a few months now, and I've finally gotten around to writing up the review!

The Figures
The set contains 10 metal figures, wearing a variety of uniform suitable for representing German soldiers from 1945 onwards. Although billed as Heer veterans they could at a pinch also be painted as Waffen SS. 
Each soldier is wearing very light fighting order, consisting of a bread bag, waterbottle, and ammunition pouches for the MP44 (StG44) assault riffle that he carries.  Some are also wearing Zeltbahn ponchos, that could also be buttoned together to make a tent. 
Uniforms are very accurate, and I really like the light order that they wear as this is the most frequently seen way of wearing field equipment seen in photos of the period. 

Each figure has a separate head, with 7 in helmets, and 3 in M43 forage caps.It's worth spending a bit of time matching heads to figures, as some of them work better with particular bodies. A couple of the faces I wasn't to keen on, however once they were on the figures and painted they have since grown on me. Some of the helmets also have molded on foliage as well, which further reinforces the 'in the field' look of the models.

Figures are clean and crisply moulded, and I found clean up to be very quick and hassle free. 

10 25mm MDF bases round out the sets contents.


Painting

I decided to paint these figures in Heer uniform, as I want to field them as Volksgrendiers alongside the new plastic set. 

As a base colour I use Vallejo's Russian uniform for my field grey. Reflective green is used for helmets, pouches and gaiters, whilst I use middle stone for the bread bags. 

For the splinter pattern camo I use a base coat of khaki, highlight and shade this, then use Vallejo either Flat Earth or Leather brown, (depending how dark I want to go), to do the bulk of the angular disrutpive pattern. Onto this I then paint smaller patches of reflective green.  Once the camoflage pattern is in place, I give the camo item a thin glaze of a mix of army painter soft tone and green inks, then do some highlights of the base colour mixed with increasing amounts of pale sand. Splinter camo is very time consuming, but can be striking! 

I wrote a guide that can be accessed on the Warlord Games site called Painting Ostfront Germans that has some more reference photos and also a list of Games Workshop alternative colours if you can't access Vallejo.

Basing

To texture my bases I use Vallejo Dark Earth texture paint, and layer this on fairly thickly. On top of this I 
Use PVA to attach clusters of course olive green flock, and Gale Force 9's dead grass. Once this had dried I decided to add some snow, so mixed Vallejo water effect with baking soda and painted this on as a thin paste into selected areas. I didn't want to give the effect of deep winter, going more for an early spring vibe. 
To add colour, I also added a few dead leaves. I've no idea where I got these from, so they are being carefully horded on my projects! To finish the figures off I also added some green leaves onto the foliage of the figures helmets.


Conclusion

A great and characterful set of figures. Retailing at £15 for the set this works out at £1.50 per figure, and also includes the base, unusually for historical figures, yet very welcome. The separate head system also allows for more variety so you could probably get a couple of boxes without getting excessive variety if you wanted too. 
The figures also fit perfectly in size with the rest of Warlords range, and could be used to increase the amount of assault rifles in your existing units as well if you wished.

Warlords figures can be purchased from all good games stores, and direct from their webpage here, 
As ever, more of my work can be viewed at Volley Fire Painting

Saturday, 2 May 2015

Terminator!

I was lucky enough to get my hands on a sprue of the T800 Endo skeletons for upcoming Terminator Genisys miniatures game developed by gaming legend Allesio Cavatore.


These figures are very, very simple to put together, and are fantastically detailed. I've always loved the Terminator films, and I'd probably put them as my favourite movie franchise of all time.
As such I wanted to do something a bit special with painting mine, so I did some light conversion work on both to make them look as if they are striding through the post nuclear war zone seen in the movies, as well as giving them that classical chrome look.

Simply using a silver paint wouldn't quite cut it, so I went back to m scale modelling stash and dug out some Alclad II Chrome lacquer. This stuff isn't for the faint hearted as it requires a truly immense amount of preparation work, but is well worth it. I've been asked a few times for a step by step, so here it is. I only have these two figures at the moment so can't do a stage by stage with photos...

  1. Assemble the figures, prime with grey primer. Leave to dry for about 12 hours. I use a cheapish primer from my local hardware shop.
  2. Spray the model with gloss grey paint (In future I'll use black as it gives a richer colour). Alclad II is a lacquer rather than a paint reacts with whatever is under neath. using a matt paint or a primer will give a dull finish, whereas a gloss base will give a shiny finish, which is what we want for Skynets finest. There is a TON of information on the net about using Alclad, so I'll not go too into it. 
  3. After leaving the gloss layer to dry for a minimum of 24 hours spray it with your Alclad Chrome. Alclad can only be applied using an airbrush, and you spray it on by misting on layers and letting the metal effect build up slowly. The lacquer is pre diluted so you just have to spray it through the airbrush, it's quite a delicate finish until it hardens too, so take a bit of care how you handle the models. 
  4. Cleaning the airbrush is worth it's own step as it's so important with Alclad. To clean the airbrush after you will need some cellulose thinners, and you'll need to give the airbrush a serious strip down and clean. Mines been in an ultrasonic bath for about 2 hours. after having a good soak in cellulose thinners and it's just about clean now. It's also worth getting a respirator mask when working with any airbrush, but especially so when working with Alclad.
  5. Whilst you've been cleaning the airbrush your Terminator will be dry enough for the next stage. First up I paint army painter dark tone into the darkest resesses of the figure, as well as picking out the teeth in white, the eyes in red, and the plasma rifle in black grey, then leave this to dry. 
  6. Mix some pledge multi-surface wax with some army painter soft tone to make a thin, but glossy glaze, and paint this over the entire Terminator to accentuate the detail, but retain the chrome finish.
  7. After the glaze has dried, pick out the eyes with some bright scarlet paint, and paint the vents on the weapon white. 
  8. Paint purple ink from the Army Painter over the vents of the weapon
  9. Paint white dots along the center of the weapon vents, center of the eyes, and teeth, and your done. No need to varnish as between the Alcad  and the glaze the paint finish is now extremely tough.

You can check out more of Terminator Genisys Miniatures game at the River Horse Website, the game is being distributed by Warlord Games And as ever you can see more of my work at Volley Fire Painting. Alclad paints and even airbrushes and respirators can be purchased from SNM Stuff