Sunday 26 April 2015

Warlord Games German Grenadiers review

Some very exciting figures have just come marching out of Warlord towers, with sets available to pre order, and the lucky Salute attendees being able to pick up boxes at the show yesterday!

The set contains 30 figures with very late war equipment and uniforms, including the short M44 pattern tunic that was styled after the British battledress, and started to be issued in the summer of 1944.

The set contains 5 sprues of 6 figures, bases for everyone, an instruction sheet and a small sheet of Heer decals, with Panzerfaust labels, rank badges Cuff titles, and helmet decals (though these are more suited for pre 1942, some did still linger around until the end). Bases are Warlords own 25mm lipped bases that are starting to become a regular feature of their kits.

Each sprue breaks down as follows

3 Bodies wearing M43 tunics 1 body wearing an M44 tunic, 2 bodies wearing Zeltbahn ponchos.


5 Heads wearing camoflaged covers on their helmets
2 head wearing an uncovered helmet (One does have a chicken wire mesh cover though).
2 heads wearing M43 caps
1 head wearing a Heer pattern crusher cap
1 bare head


Weapon options are :-
2 MG 42's
3 MP44 assault rifles
3 K98 Rifles
2 G43 rifles
2 MP 40  Sub-machine guns
1 PPSH 41 Sub-machine gun
 2 Panzer Fausts
1 Grenade


6 bread bags with attached waterbottles, some also have mess tins and Zeltbahns rolled and attached.
4 gas mask tins
a spare barrel case for an MG42
Holster and MG tool case
1 arm carrying a box of machine gun  ammunition
1 ammunition belt
Various ammunition pouches
 A map case

Lots of arms, including ones reading a map, and one carrying binoculars.


1 Iron Cross!

This is an excellent and characterful set. some of the arms are molded to the weapons to make assembly a doddle, others feature open hands, however the nature of the design means that assembly will prove simple.

The set is £26 and I believe represents excellent value for money. I'm currently building some as passengers for my StuG, although I'll be building some as heer, some as Waffen SS. I'm very much looking forwards to working through these, and whole heartedly recommend them to anyone even thinking about a late war Heer or SS force.

You can pre order the figures from Warlord here  and see more of my work at Volley Fire Painting Service


Monday 20 April 2015

Spinning a tale, starting out with Saga Crescent and Cross

The Saga games have been available for a couple of years, and as I like to keep my finger on the pulse of gaming I've finally decided to look into the game and give it a whirl. 
After contacting my local model shop, Rochester Games and Models I went and picked up the Crescent and Cross rulebook, and a box of Fireforge Games Templars on foot. If your in the Medway area it's worth checking into the model shop as they have a great range of stuff!


I've not had a chance for a game of Saga yet, however my initial impressions are that it's a very simple game, with a lot of subtly to it. The book is very nicely presented and comes with everything you need to start playing, apart from figures. 

Usefully, at the back of the book is a page with all the relevant counters and markers for you to copy and use in your games, as well as a chart so that you don't need the Saga dice that are available. 

Included in the book are 6 army lists for 3 Islamic and 3 Christian factions. I've initially chosen the Milites Christes as locally we have a local Knights Templar manor locally. I may instead play them as Crusaders though, as I quite like the thought of having lots of peasant pilgrims tagging along with the Knights, and these aren't allowed in the Milites Christes list. I believe these forces are compatible with the lists in Dark Ages Saga as well, allowing for some cool what if history possible. 


The Fireforge figures are excellent too, around the size of a Foundry or Perry figure, with a lot of options. The set allows you to build 12 crossbowmen, 12 spearmen, lots of models with hand weapons, and tons of optional heads and arms, and command parts. I'm really impressed and excited by these sets, and am contemplating getting more of the range too. 


So far I've built 12 figures with hand weapons and shields, I'll use these as either Sergeants if I want to play Lion Rampant, or build another 4 to have 2 units of Warriors in Saga. The remaining 8 figures I'll be building tooled up with capes and command parts to be my hearthguard for Saga Crusaders, or alternatively use them as men at arms on foot for Lion Rampant. 

To add variety on a couple of figures I have added some spare Gripping Beast Viking Arms I had knocking around, and I'll use the spare crossbowmen arms and heads from the Fireforge set to added to the Gripping Beast bodies to make myself some Crossbow armed figures.

I've gone for a really battered, bloody and worn feel to my figures, as they just look like double hard bastards when they were put together. A theme I'll carry over to my other Saga forces too(!)

As ever more of my work can be viewed at
Volley Fire Painting Service


The Legion! 28mm French Foreign Legion

I've recently finished these French Foreign Legion and Tauregs for my mates over at Colonel Bills.

I was asked to paint these figures up to go on Colonel Bills stand at Salute next weekend, as he will be stocking the range. 

From the words of Colonel Bill himself 'All the figs come in packs of 4. The foot are £6 per pack and the mounted £9. There are one or two accessories, such as weapon packs etc. There is also a Laurel and Hardy set and a Beau Geste character set. I if anyone wants to pre order for Salute, and get our 10% pre order discount, if they contact me directly I will sort everything out' Colonel Bill can be contacted via their website here Colonel Bills

The figures were exceptionally well cast, and are also full of character. This isn't a period I'd normally be interested in, but however these are nice figures, I particularly liked the skirmishing Legionaries actually. First thing that struck me after I had stopped thinking (giggling),about Carry on Follow that Camel Was how good these would be for skimish and pulp adventure gaming, I could see myself getting some of these to use for stuff like In Her Majesties Name too.


All in all, great figures, and worth checking out! 


Figures were painted with Vallejo Prussian Blue for the tunics and robes with army painter blue ink for shading, before mixing increasing amounts of Prussian blue with white for the highlights.

 The white colours were done using Vallejo Off white as a base, and then using army painter soft tone to shade them, before working up in layers from deck tan to pure white.


Bases were done using Games Workshop Agrellan Earth, and various static grasses acquired on my roaming at shows.


As ever you can see more of my work at Volley Fire Painting Service


Tuesday 14 April 2015

28mm, 1/56 StuG Variants reviewed

In today's finale article of StuG week I will be looking at The Die Waffenkammer StuG I, in the camoflage with the foliage, and  Warlords StuG III D which is in grey primer (For now...!)

The StuG III D Was produced between May and September 1941and carried the short barreled 75mm gun, origionally intended to support infantry attacks but suppressing enemy positions and bunkers.
 As more StuGs were committed to Operation Barbarossa and the fighting in Russia the StuG proved itself to be a very effective tank destroyer, and this lead to it's evolution into the Ausf G as seen in the other kits I have reviewed earlier in the week.

Warlord released this kit last year and it's very simple, the hull and tracks are resin, whilst the hatches, gun, headlights and gun cleaning rods are metal. Apologies for not actually getting this one painted for the review, however I'll probably do a step buy step guide to how I airbrush a Panzer Grey model.

I really do love this model, there's something cool about the short barreled StuG, but this kit is very nice and cleanly cast, with very crisp and delicate detail, it just feels right. No instructions or decals are included, but it's simple enough not to require instructions.


Also reviewed here is the StuG IV from Die Waffenkammer. I've had this one done for a while, but wanted to include it for the sake of completness. The StuG IV was built to supplement production of the StuG III following heavy allied bombing on the Alkett factory outside of Berlin in late 1943, and the StuG IV was simple old or refurbished Panzer IV hulls with a StuG superstructure attached. They were issued from early 1944 up until the end of the war. Notabley the 17th SS Panzergrenadier division used StuG IV's in place of panzers during the battle of Normandy.

The comments used to describe Die Waffenkammers StuG III all apply to the IV as well, and I believe it even comes with a similar quantity of stowage. Again, it's a fantastic little model, and a fairly unique way to add flavour to a late war force.

There are other kits of the Ausf D and StuG IV on the market, however I've not been able to get my hands on them, I believe Army Group North do kits of both vehicles though, and I did do another StuG IV for a mate, but it was molded an orange resin, and was very crude. I'm not sure who produced it so I've not reviewed it here.

I hope you have found my series of StuG reviews interesting and useful, and if there are any other vehicles you would like me to provide a similar themed review series on let me know either in the comments section or though the Volley Fire Painting Services Facebook page.


Warlords StuG III D can be purchased here at Warlords website.

Die Waffenkammer kits can be purchesed either through the website here Or through one of their regional distributors such as Campaign Games and Logisitcs in Australia, and Great Escape Games in the UK.

I'd like to extend my thanks to Warlord Games and Rubicon Models for providing the plastic StuGs that were reviewed earlier on, keep up the great work guys!


Sunday 12 April 2015

28mm 1/56 StuG III Ausf G kit round up and comparison.

Day 4 of StuG week and here is the round up of all 4 kits reviewed. I'm not sure if Warlords resin kit is going to remain available, however I have included it in the comparisons as I'm sure many people will be familiar with this model. 


In the attached photos the vehicles are as follows, the plain sand vehicle is Blitzkriegs, the sand and green vehicle numbered 221 is Warlords new plastic. The sand with heavy over spray of brown, large number 13 and heave covering of foliage is Warlords old kit. The sand green and brown vehicle numbered 222 is Rubicons and finally the vehicle with the heavy brown over spray and missing Schurzen panels is Die Waffenkammers.


First of all I have prepared a brief table to compare what I feel to be the salient points of the various kits listed to allow you to see at a glance what appeals to you most in a model. 


I'll let the pictures do alot of the work here as the models can speak for their own quality, all are very good though, and you won't be disappointed with any of them. 

  From this we can see the plastic kits are much more time consuming to build, however they are easier to convert and add battle damage too if that's your thing, and personally I prefer working with plastic as well, it reminds me of building the old Airfix and Matchbox kids from the newsagent as a kid!


In terms of price all the models are around the same, Die Waffenkammer though wins out through sheer amount of stowage and extra parts. Warlord however are offering their kit in a boxed set of 3 with some figures from their forthcoming panzer grenadier set for £50, and if your looking to get several vehicles it's very hard to beat this offer. 

In terms of detail, for me Warlords new plastic kit is the best of the bunch, with Die Waffenkammers a close second. It was hard to pic between them however Warlord crispness and finesse won it for me. 

Rubicon and Blitzkriegs models are both very sturdy, and Rubicons has a lot of flexibility in that you can interchange weapons and Schruzen without gluing the parts in place. Warlord does allow the swapping of weapons as well however. Also impressive are the amount of variants possible with Rubicons kit, although these do need to be fixed in place.

Warlord and Die Waffenkammers kits both come with crew figures, with Die Waffenkammer's having more men than hatches! 

Individual reviews of each kit can be found at the links below
Blitzkrieg
Die Waffenkammer
Warlord
Rubicon 

I think overall my favourite is Warlords new plastic kit just for it's sheer finesse, however Die Waffenkammers kit is superb, however the plastic is my preferred medium to work with. Rubicons is an excellent model as well, and great if you want a lot of flexibility out of a kit, whilst Blitzkriegs is marvelously elegant and simple, so there is no real out right winner, but hopefully I'll be able to help you in picking a kit that appeals to you.  

As ever more of my work can be seen here at Volley Fire Painting Services. If you'd like to contact me either leave a message on the blog or through Volley Fire, and if there are any other series of kits you'd like me to treat in a similar to StuG week let me know!

Saturday 11 April 2015

Rubicon Models 28mm 1/56 StuG III Review

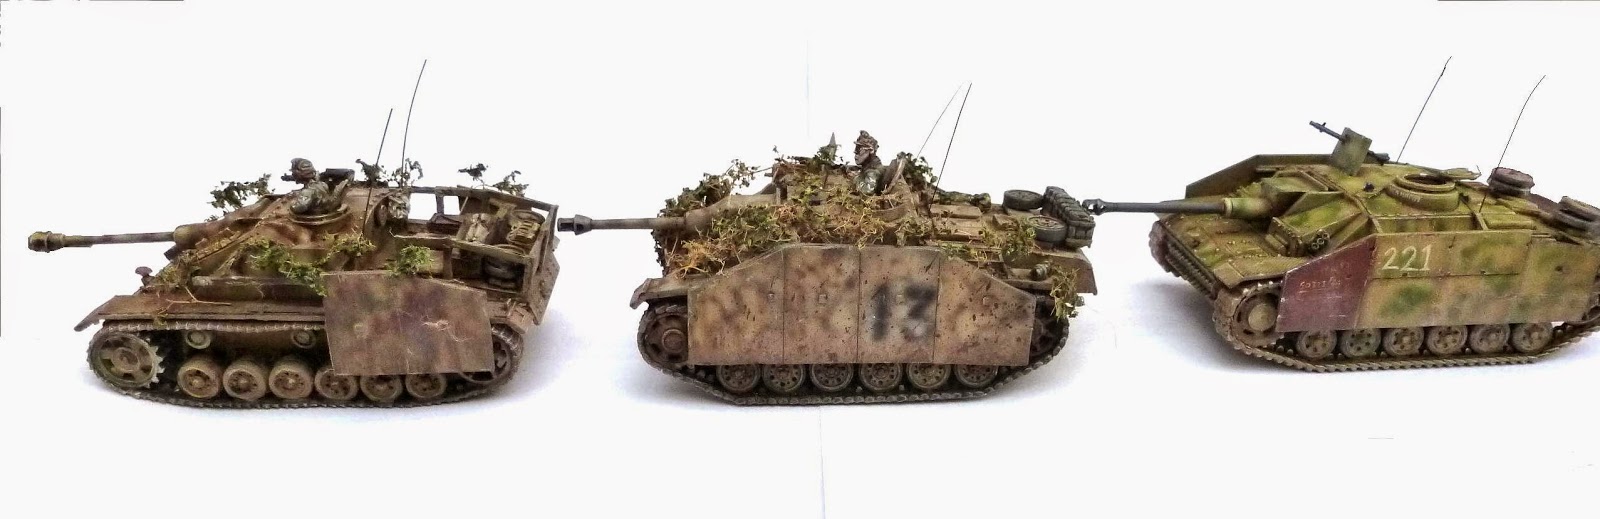
Day 3 of StuG week and this time it's Rubicons new plastic StuG kit!

Today's StuG facts concern the operators of the StuG. Unlike most German vehicles the vehicle was operated by by quite a few nations. Apart from Germany, the StuG was operated by Romania, Finland, Bulgaria, Hungry, Italy, Norway, Spain, Syria, Turkey, Russia, Sweden and Yugoslavia.

Rubicon's StuG is currently up for pre-order with it's various distributors, and comes on 3 sprues along with instructions and transfers. The kit is smartly molded in dark grey hard plastic, and is very cleanly molded. You get options to build early, mid and late versions of the StuG, with optional super structure roofs, early square and late Saukopf gun mantlets, both types of Machine gun mount, optional stowage bin rails for the engine deck, optional open or closed crew hatches, optional spare tracks for the front hull, early and late 75mm guns, and also a 105mm StuH 42 weapon too. The kit also includes clip on Scurzen.

Detail is good, although the tread pattern on the anti slip decking is a little pronounced. If you wanted to you could lightly sand it so it doesn't stand out quite so much. Pioneer tools and machine guns are nicely done too, and quite delicate. I did find the late style V shaped remote control machine gun mounting a bit thick for my tastes though, and opted to use the earlier style mounting instead.


Assembly is fairly quick, and the tracks are one piece with separate wheel halves that attach at the rear to show the two part nature of the wheels. The only draw back to this is that there is no tread detail other than the teeth of the tracks, and the inside runs are smooth apart from the guide teeth.


The Scurzen is clip on, similar in style to that found in Rubicons Panzer III and Panzer IV kits, and is designed more for strength and gaming rather than modelling, as it doesn't include any hanging rails or supports. The fit is quite secure, but I'd still suggest a little caution when handing the model with the Schurzen on if your not intending to glue them into place.


The main guns are also optional, and you can fit either the 105mm gun for the StuH or the StuG's 75 mm gun, and these are designed to be interchangeable, however the tolerances are quite tight, and I painted my weapons before adding them to the vehicle, and found that I couldn't get the 75mm out again once it was in place. the gun mantlet fits onto a bar in the superstructure, and I didn't want to try using too much force as the part could have snapped, and I didn't want to loose my weeks supply of gruntle.


Painting was the same as for the other models, so instead of repeating myself I'll talk about how I do the scratches and chips to the paint work.

1. Paint the model, all the camo and decals, but before any washes.

2. Get a piece of packing foam from a blister pack, tear off a chunk so it's a rough triangle shape then dip this in some dark reddish brown paint, I use Vallejo hull red, but any's good, then dab and drag the foam over the model in a random pattern, adding more dabs to areas of high use and anywhere you want to have more damage to the paint.

3. Get another peice of packing foam, and dip it in a dark metallic colour, I like Vallejo Gun Metal, though Bolt Gun Metal is equally as good. Do the same dabbing of paint onto the model, but restrict yourself to areas already hit with the dark red colour. This will give the impression of bare metal showing through the priming layers.

4. Mix whatever colour you used for the bulk of the model with some white in a roughly 50-50 ratio. In the case of these StuG's I used Middlestone and White from the Vallejo range. Then, using a very fine brush paint this onto the edges of the scratches you made using the foam, you don't have to paint around the entire edge, just a little dot or a scrape is fine as it gives the look of peeling paint catching the light.

5. Give the model a coat of gloss varnish, anyone you like. Personally I use Pledge Multi surface wax as it's none reactive to paint and very cheap, but whatever you have to hand works. Leave the model to dry for 24 hours.

6. Using artists oils Burnt Umber mix a thin wash and paint this into the recesses and also let it run to create streaking. Add  as much or as little as you like. to show wear and tear.


I found Rubicons StuG to be a quick and simple model to build, the details not quite as refined as on other kits, but it will be a sturdy model for the gaming table and does look nice.


The other StuG week reviews can be found at the following links :-
Die Waffenkammer
Blitzkrieg
Warlord

You can find Rubicon's distributor in your region here

As always more of my work can be seen at Volley Fire Painting Services