Showing posts with label Bolt Action. Show all posts

Sunday, 4 June 2017

Plastic Soldier Company 20mm Afrika Korp review

Today I'm taking a look at one of my favourite subjects, the Afrika Korp. Having picked up the new PSC platoon set at Salute, I've been eagerly working on Afrika Korp ever since.


I opted for the platoon set after admiring a few of the figures in blisters, and decided that I wanted them to make up the bulk of my infantry forces in my growing DAK collection. The set contains 39 white metal figures, wearing a mix of steel helmets and M40 tropical caps, no pith helmets are included.

For equipment, the 39 figures include the following,

3 NCO's with MP40's, split across two poses. One wearing a helmet and pointing, the other advancing bracing his weapon.

6 machine gun teams. Each team consists of the men, and wear a mix of helmets and tropical caps. These figures can also be freely intermingled to create some variety, and are posed either standing and advancing or prone firing.
 
 Worth mentioning is the separate bipod for the prone gun team, as this adds and extra level of finesse to the finished models. Each team comprises one gunner, and two loader/assistant types.

The rest of the set is made up of riflemen, wearing the same mix of head gear. All are armed with K98 rifles, and have a pleasing variety of field gear and skirmishing poses. between  the mix of head gear and poses, I think there are about 10 different poses, and look nicely varied when assembled.


The figures are white metal, and casting was for the most part very clean, though I did have a few mould lines and areas of flash to clean up, however this didn't take long and lines were in accessible places and didn't interfere with any detail.

It took me a little while to notice, however several of the figures wearing helmets have their field caps tucked into their belts, which I thought was a great little touch. Unforms are all the standard tropical issue stuff, with everyone wearing long trousers and tunics.

In terms of compatibility with other ranges, the figures are very close to AB in proportions, however they also mix very well with Kellys Heroes, Brittania and Italeri. I do not have any Wartime Miniatures DAK to hand at present.

At £40 for the set, I think this is good value as it's provided me with the bulk of the infantry I'll need for my Afrika Korp project, and I'm hopefully the range will sell well and we can see it expanded with command and support weapon options. For now, I've added those elements from Kellys Heroes and Britannia ranges, and find the over all effect most pleasing.

You can get your own platoon of DAK from the PSC website here, and listen to our podcast episode where we speak to one of the minds behind Battlegroup Tobruk, Mr Piers Brand here.
Finally, you can see more of my work or contact me regarding commissions at Volley Fire Painting Service


Thursday, 4 May 2017

The Brit, The Yank and the Hobby episode 22 Sea lion


In Episode 22 we are joined by author, scientist and games designer John Lambshead, with his latest work, the Sea Lion supplement for Bolt Action. 

John talks to us about some of the history and new game mechanics he's added, as well as the historical basis for what is arguably the biggest campaign that never was.

You can listen to the show at the following links from 05/05/2017

Come on over to our facebook group to join in the discussion, and drop by Johns blog to see what he's up to as well! I'll have an in depth look at the new book here very soon as well... 

Monday, 24 April 2017

The Brit,TheYankandTheHobby, Salute 2017

This week Andy has been off to Salute, head over to the facebook group to see all the pictures as you listen in. I've sorted them into gallery by manufacture, so you can see all the things I managed to get round to viewing.

Libsyn Feed

RSS Feed

iTunes


Wednesday, 11 January 2017

Warlord Games 1/56 Panther Ausf A review

Firstly, my apologies to Warlord Games who supplied me with a kit of this vehicle sometime ago, however I'm only now getting round to writing about it... 


Warlord's Panther tank is produced by scale model manufacturer Italeri, and I believe this kit is a pretty much direct descendent of their mid 1990's 1/35th scale kit scaled down to 1/56, and simplified for Wargamers.                                            

The kit comes on 2 sprue, with a small decal sheet and commander figure included. Use of slide mould technology is evident too, as the gun included a pre drilled muzzle. 


Assembly is quick and simple, though attention needs to be paid to the tracks as they are handed, and also need dry fitting. I found fitting the top run, then the lower run, and then the outer part of the drive sprocket the easiest way to assemble them, and used plastic weld to assemble the kit. 


Fit was good, and a little flash was present in places, but nothing major. Only issues I found were the towing shackles were a little small and fragile, and most of them either broke or snapped, so I ended up ditching them completely. 

Detail is generally nice, though I found the tools a little light in relief, and could do with either being a separate part, or moulded a little deeper. The Zimmerit also looked a little too neat on the sprue, but painted looks good, and it also saves a vast amount of work creating your own. 


To paint my Panther, I used Vallejo middlestone sprayed over black primer as the basis for the dunkelgelb, then mixed increasing amounts of pale sand in to get a fairly high contrast graduation in the colours. For the camo pattern, I used Vallejo Mahogany and Luftwaffe camo green, before using a fairly big range of MIG washes, pigments and filters to weather the tank.


Foliage is made from sea foam sprigs, and you can find a guide to how I do it at the Warlord Games site here

Overall, this is another good kit from the Warlord/Italeri partnership,
You can visit the Warlord Games website here, and as ever, more of my work can be found at Volley Fire Painting Service.


Rubicon Models US armour reviews

In these reviews, I'm doing something slightly different, and rolling several reviews into one, as I built all the kits at the same time, and most of the comments are the same of each of them, though I'll cover each individually too. In the interests of integrity, Rubicon have been kind enough to provide me with review samples of each of the kits below, however these particular vehicles were part of a work commission.

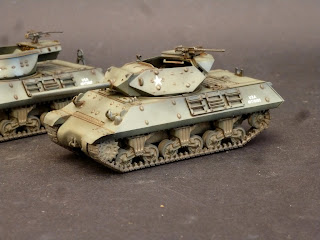
Rubicon Models have quite an extensive line of mid to late war US armour in their catalogue now (I do keep harassing them to make an M4A1 too...), and whilst I've already looked at their M5 Stuart and M4A3 Shermans, this time I've been building the M3 halftrack, M8 Scott, M10 and M36 tank destroyers, and the  M20 armoured car. 


All of these kits come with Rubicons standard packaging of a letterbox type packaging with each sprue individually bagged to prevent loss of parts, as well as an extensive decal sheet, and well laid out instruction booklet. Each kit contains multiple variants, so it's worth taking a few minutes before cutting things to identify which variant you will build, and what parts you will be using.

All of the vehicles were painted the same way, using a black primer as a base, and then airbrushing Vallejo Brown Violet over most of the vehicle, leaving some black visible in the recesses. around the edges and raised areas I then airbrushed Vallejo Green Grey, before weathing them using some Burnt Umber oil paint used as a wash around the details and recesses. 
 

M3A1 Half Track
The M3A1 kit actually gives the option of assembling the vehicle as either an M3, or an M3A1, with a choice of winch or bumper at the front, deployed or stored stowage racks, open or closed radiator grill, and open or closed armoured wind shield, as well as pose able machine guns and a choice of interior radio fits, and also comes with 2 crew figures. 


Decals are also note worthy, as they contain some nice Free French markings,  as well as a good jumble of codes and stars too, so will be useful for future projects too.


I found the kit to be a fairly quick build, with some very nice detail and good fit to the parts. The only part of the kit that failed to impress me were the crew figures, although fortunately these are barely visible.


I still opted to use the driver and omit the other passenger. Some inevitable comparison will be asked with the Warlord Games plastic M3A1, and there's very little between the two, though Warlords is probably a marginally simpler to assemble kit, and comes with less decals and no choice of variants. I'll be adding Rubicons kit to my own DAK force as an M3 variant at some point in the none too distant future. 


M8 Scott
Another nice kit, the M8 Scott allows you to build either an M5A1 Stuart, or M8 Scott. 

There's little cross over here either, but with a bit of care and creativity you could build both and swap parts as each variant is required if that's your thing.


Between the Stuart and the Scott, I prefer the look of the finished M8, the spare track parts on the turret have slightly more impact and definition than on the Stuart parts, and the finished vehicle just has more impact. Turret interior is pretty good too for the M8, although it's lacking in crew and you'll have to convert some up if you want to fill their void. 

Assembly is straight forwards,  and rounded off by another well stocked transfer sheet with a good selction of markings, with options for several nationalities covered, including the USA, Britain and France. 

M10 Tank destroyer
This one comes with some fairly notable options, namely the choice of building an M10, an M10A, an M36 and finally an Achilles tank destroyer. 


Parts for these are all fairly specific,especially due to the way the turret rings are constructed, although you could potentially work out a way to make them interchangeable with a bit of work, the kits not really designed that way.


Interior detail for the M10 vehicles is good, though no interior is provided for the M36 turret apart from a gun breach.


Oddly, whilst ammunition racks are provided in for the hull, there is no floor, which is a fairly visible part of the fighting compartment. Sadly, no crew or stowage are provided, though once again the decal sheet is superb. 


M20 Scout Car
The final kit I'm looking at today, the M20 kit also includes parts to build the M8 armoured car as well. This was a bit of a surprise kit as it has some really superb detail.


It's not an easy kit to switch between versions however, so be mindful of that if you're intending making it as both. assembly is a breeze though and the finish model is superb to my eye. 


Of the 4 of these, I think my favourite is probably the M20/M8, although I really like the M3 kit too. the Scott is good value for money, though I have to admit to being disappointed in the M10, as I felt it a little lacking, though I'd struggle to put my finger on what precisely. 


Rubicon Models can be obtained through Plastic Soldier Company in the UK, and from their US distributor for those in America, and as ever you can see more examples of my work or contact me regarding commissions at Volley Fire Painting Service.


Tuesday, 10 January 2017

Bolt Action 28mm United States Marine Corp

A few years ago now, myself, Jez Allum, Jamie Tranter and Brian Ward got together to produce a blog chronicling us collecting 1000 point armies for Bolt Action. 


I opted to the USMC, and thought it time to revisit the article series by collecting links to the armies creation below. 


In this instalment I discuss the motivation behind collecting the Marines, and what I chose to add to the force.

As the name suggests, in this segment I look at some simple tricks and cheats to get the best out of the various plastic sets now on the market, and how to reduce the stress of working with multipart figures.

A step by step guide to how I painted my Marines.

I like Shermans, and here's the one I added to the army, as well as how I painted it. 

As you may have surmised, this is the completed army and my thoughts on the project. 

My Marines inaugural battle report.

You can see more of my more recent work at Volley Fire Painting services, and listen to the episodes of The Brit, The Yank, and the Hobby podcast here, where we discuss a few of the USMC's more famous actions. 


Rubicon Models 1/56 Jagdpanzer 38t Hetzer review

This kit has been out for a little while, so much so that I won one at the (Cam)Bridge to Far event in March of last year... 


The Jagdpanzer 38t is one of those late war vehicles that is so iconic, and such a good modelling opportunity that it's likely to appear in most late war gamers collections, and this kit from Rubicon Models is certainly a very welcome addition to their line up of plastic vehicle kits. 


Rubicons Jagdpanzer comes nicely presented in their typical box, with each sprue individually bagged, with a very good decal sheet that comes with the standard range of German markings, as well as vehicles used by the Russian Liberation Army and what I believe are Czech Partisan forces.


The kit provides numerous options as is the norm for Rubicon, offering the builder the choice of creating early, mid and late production vehicles, as well as a Flammpanzer 38t. No stowage or crew figures are provided however.

I opted to build the late production vehicle,  and found assembly to be quick and straight forwards, though I do recommend taking the time to read through the instructions and ensure you are familiar with the variant you are going to build. 


The Jagdpanzer was painted first with black primer, then airbrushed with Vallejo Middlestone, this was modulated with increasing amounts of Pale Sand, before a disruptive pattern of Vallejo Mahogany was added.


Some pin washing of Burnt Umber oil paint, and the Jagdpanzer 38t was complete. Personally, I rate this as Rubicons best kit, and thoroughly recommend it. This particular vehicle was a clients, for a commission, however I have one of my own in the stash for when I eventually get to expanding my late war German collection.


Rubicon Models can be obtained through Plastic Soldier Company in the UK, and through their own distributor in the United States.
As ever, I can be contacted through Volley Fire Painting Service on Facebook, and you can even see more painted examples of my work there too. 


Monday, 19 September 2016

Warlord Games 1/56 Churchill

As part of the on going operation Sand Dune project with Carl Titterington, Sam Phillips and myself, and with my DAK army nearly done now, I've decided to start branching out into the British forces. Warlord Games were kind enough to supply me with some of their new plastic Churchill tanks to form the core of my Tunisian forces. Today I shall be reviewing the kit and describing the options included. 


Warlords Churchill is another collaboration with Italian model kit manufacturer Italeri, and looking at the parts break down I suspect it's lineage goes back to the Dragon 1/72 scale kits of this impressive tank. 


 The kit is supplied in dark grey plastic with each frame packaged in it's own bag, and a decal sheet is included (And which I forgot to photograph). Also included is an instruction sheet, and I recommend going through this first and marking all the parts you want to use for the version you are building, so as to avoid any confusion later. The instructions I felt are pretty clear, though care should be taken when following them. I didn't pay too much attention to them and managed to somehow assemble the tracks wrongly.

The decal sheet is nicely done,  with a good selection of regimental markings and flashes, and also includes a Soviet guards badge for making a lend lease vehicle. Only three things jump out at me from the sheet, it includes a number jumble for making the vehicles registration code, but doesn't come with the 'T' prefix, the squadron flashes have a black filler inside of the geometric shape, I'd have much preferred this to be open so that it can be blackened later if desired. Finally, some names would have been welcome, though that may be pushing the limits of what is possible with a small sheet. 

Assembly is actually very straight forwards (When you bother to read the instructions...), I glued some pennies into mine to give it a little more weight and heft, and also replaced the antennae with fuse wire but that was it. Building mine as the MKIII the use of slide moulding was evident, as the gun (as will all of them), is pre drilled and in scale. The only small, fiddly parts are the head lights at the front of the vehicle, the rest is made up of large panels that fit nicely. I do really recommend using a proper plastic glue or solvent, and dry fitting though as going straight in with super glue will make for a bad day.

Warlords Churchill allows you to build one of the following versions, MKIII, with welded turret and 6 pounder gun. The MKIV with a welded turret and 6 pdr. MKV with 95mm howitzer, Mk VI with 75mm gun, this has a particularly nice muzzle brake too. There is also an option to build the NA75mm version. Eavh of these looks good and is pretty accurate. If you are someone who likes swapping variants this could be a problem, however if you made judicious use of magnets it may be possible.

Also possible in this kit is the option to build the AVRE, the Petard mortar is well done, however quite a few of the hull fittings are missing so it's hard to build an accurate model of the vehicle straight from the box if that is what you require. 


Luckily S&S models are coming to the rescue, and will be bringing out a series of update and conversion kits for the AVRE, that will also allow you to build a few of the different options. I'll be getting myself one of the bridge layers when it comes out.


To paint my Churchill I primed black, and then airbrushed Vallejo USA Olive Drab. I then mixed some Vallejo Pale sand in, applied the transfers, then let the paint dry for 3-4 days. I then came back to the tank, painting AK4062 Light Dust Deposit over the entire vehicle, before using a broad brush lightly dipped in white spirit to work most of the Light dust off the model. I then repeated this process a few times until the dust had built up to a level I was happy with. 

After placing the Churchill to one side to dry for another day, I came back to it and did the same thing using AK4063 Brown Earth Deposit, concentrating this onto the tracks and working parts, as well as the lower hull and anywhere dirt may accumulate in thicker quantities.


 Again, the tank was left for a few days to dry, before I painted MIG 1000 wash for Dark Yellow into the darkest recesses and deepest panels. 


Finally, I used a selection of artists oils to add some streaking to the sides, and some MIG Oil and Grease to some of the drive wheels and engine deck. A quick drybrush of the tracks with a dark steel colour I mixed up and the Churchill was complete. 


The crewman is the one included with the kit, and very nice he is too. 
I'd sum this kit up by saying it was an excellent build, but one must exercise some caution to ensure you are building the correct version you want, and also to get the tracks together correctly. at £20 the kit is good value, and is quite sizeable too. Warlord also sell the Churchill in a platoon set, with 3 vehicles for £50. My thanks to Warlord Games for providing the kit, and you can see more of my work or contact me regarding commissions at Volley Fire Painting Service