 In these reviews, I'm doing something slightly different, and rolling several reviews into one, as I built all the kits at the same time, and most of the comments are the same of each of them, though I'll cover each individually too. In the interests of integrity, Rubicon have been kind enough to provide me with review samples of each of the kits below, however these particular vehicles were part of a work commission.
 Rubicon Models have quite an extensive line of mid to late war US armour in their catalogue now (I do keep harassing them to make an M4A1 too...), and whilst I've already looked at their M5 Stuart and M4A3 Shermans, this time I've been building the M3 halftrack, M8 Scott, M10 and M36 tank destroyers, and the M20 armoured car.
 All of these kits come with Rubicons standard packaging of a letterbox type packaging with each sprue individually bagged to prevent loss of parts, as well as an extensive decal sheet, and well laid out instruction booklet. Each kit contains multiple variants, so it's worth taking a few minutes before cutting things to identify which variant you will build, and what parts you will be using.
 All of the vehicles were painted the same way, using a black primer as a base, and then airbrushing Vallejo Brown Violet over most of the vehicle, leaving some black visible in the recesses. around the edges and raised areas I then airbrushed Vallejo Green Grey, before weathing them using some Burnt Umber oil paint used as a wash around the details and recesses.
M3A1 Half Track
 The M3A1 kit actually gives the option of assembling the vehicle as either an M3, or an M3A1, with a choice of winch or bumper at the front, deployed or stored stowage racks, open or closed radiator grill, and open or closed armoured wind shield, as well as pose able machine guns and a choice of interior radio fits, and also comes with 2 crew figures.
 Decals are also note worthy, as they contain some nice Free French markings, as well as a good jumble of codes and stars too, so will be useful for future projects too.
 I found the kit to be a fairly quick build, with some very nice detail and good fit to the parts. The only part of the kit that failed to impress me were the crew figures, although fortunately these are barely visible.
 I still opted to use the driver and omit the other passenger. Some inevitable comparison will be asked with the Warlord Games plastic M3A1, and there's very little between the two, though Warlords is probably a marginally simpler to assemble kit, and comes with less decals and no choice of variants. I'll be adding Rubicons kit to my own DAK force as an M3 variant at some point in the none too distant future.
M8 Scott
Another nice kit, the M8 Scott allows you to build either an M5A1 Stuart, or M8 Scott.
There's little cross over here either, but with a bit of care and creativity you could build both and swap parts as each variant is required if that's your thing.
 Between the Stuart and the Scott, I prefer the look of the finished M8, the spare track parts on the turret have slightly more impact and definition than on the Stuart parts, and the finished vehicle just has more impact. Turret interior is pretty good too for the M8, although it's lacking in crew and you'll have to convert some up if you want to fill their void.
Assembly is straight forwards, and rounded off by another well stocked transfer sheet with a good selction of markings, with options for several nationalities covered, including the USA, Britain and France.
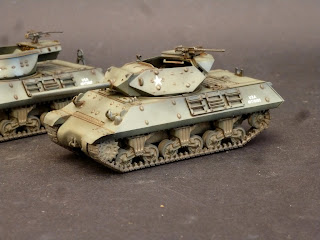
M10 Tank destroyer
 This one comes with some fairly notable options, namely the choice of building an M10, an M10A, an M36 and finally an Achilles tank destroyer.
 Parts for these are all fairly specific,especially due to the way the turret rings are constructed, although you could potentially work out a way to make them interchangeable with a bit of work, the kits not really designed that way.
Interior detail for the M10 vehicles is good, though no interior is provided for the M36 turret apart from a gun breach.
Oddly, whilst ammunition racks are provided in for the hull, there is no floor, which is a fairly visible part of the fighting compartment. Sadly, no crew or stowage are provided, though once again the decal sheet is superb.
M20 Scout Car
 The final kit I'm looking at today, the M20 kit also includes parts to build the M8 armoured car as well. This was a bit of a surprise kit as it has some really superb detail.
It's not an easy kit to switch between versions however, so be mindful of that if you're intending making it as both. assembly is a breeze though and the finish model is superb to my eye.
Of the 4 of these, I think my favourite is probably the M20/M8, although I really like the M3 kit too. the Scott is good value for money, though I have to admit to being disappointed in the M10, as I felt it a little lacking, though I'd struggle to put my finger on what precisely.


